
Construction stakeout guide

Construction stakeout with GPS, from the engineer's drawing to the stake

If you lay out with a laser level and a tape, this page shows how GPS changes the job, start to finish. Load the civil engineer's drawing into Emlid Flow and one person walks straight to every corner, offset and grade on the plans, with cut and fill on the phone.

  • Foundation layout
  • Road and curb staking by station and offset
  • Dirt work: cut and fill to design
  • As-builts on the same coordinates
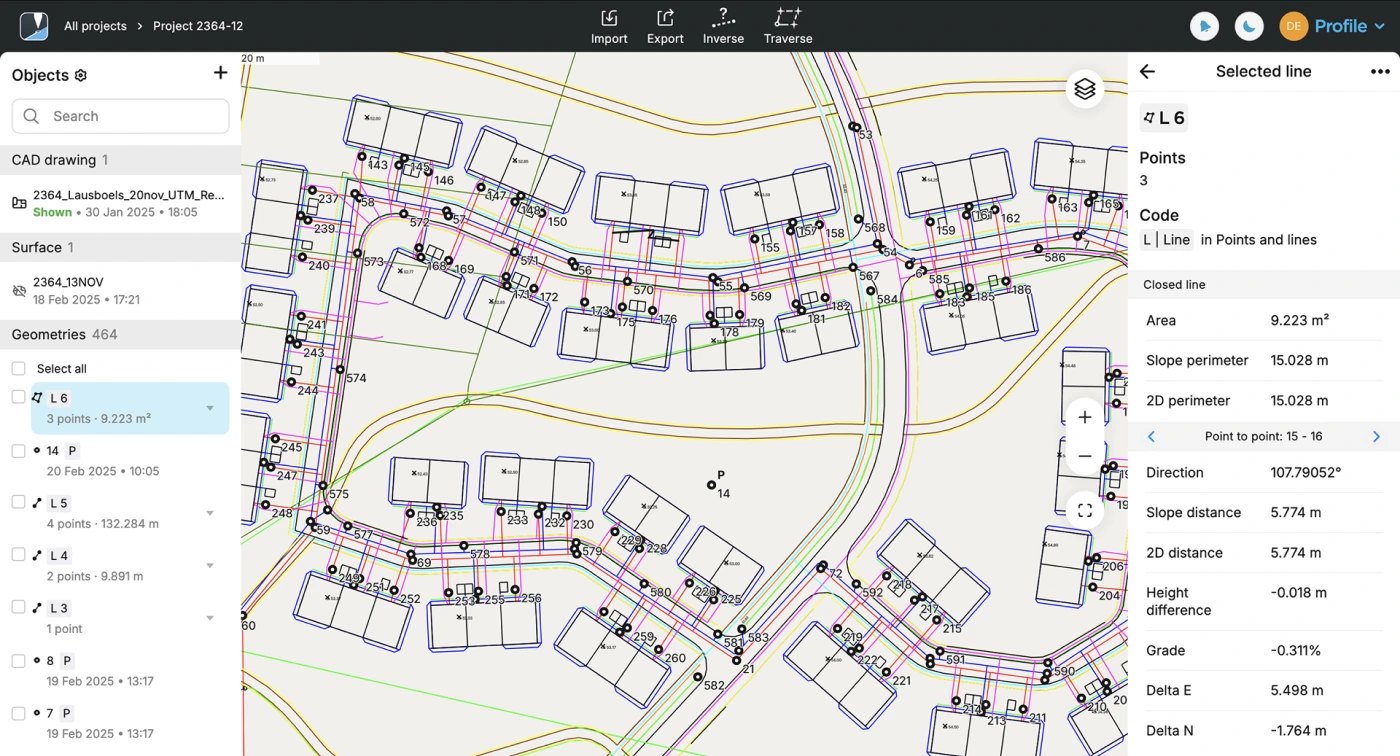
A civil engineer's CAD drawing loaded in Emlid Flow 360
Laser and tape, or GPS?

Same plans, same stakes. A lot less walking back and forth.

A laser level and a tape are accurate and proven, and you already know them. GPS doesn't replace good practice. It replaces the measuring: your rover knows where it is on the site's coordinates, so every point, line and grade on the drawing is one walk away.

What most crews start with

Laser level and tape

Set up the laser, shoot elevations off a benchmark, and pull tape from known points to square up corners and offsets.

Best at
  • Elevations on a small, open pad
  • Checking form heights
  • Nothing new to learn
Watch out for
  • Two people for most measurements
  • Errors build up from point to point
  • Needs line of sight and short distances
RTK GPS and the engineer's drawing

GPS and Emlid Flow

The rover knows its position on the site's coordinates to about a quarter inch horizontally and a half inch vertically. Load the drawing and walk to anything on it.

Best at
  • Every point on the plans, by one person
  • Road stations and offsets
  • Live cut and fill anywhere on site
  • As-builts on the same coordinates
Watch out for
  • Needs open sky: hard against tall walls and under heavy trees it struggles
  • Tight elevation tolerances, such as top of footing: check with a level or total station
  • Needs site control and a georeferenced drawing

Which tool for which job

JobLaser and tapeGPS and Emlid FlowWhy
Foundation corners and offset stakesWorks wellBest choiceNo squaring up from a baseline: walk straight to each corner from the drawing.
Road centerline, curb and offset stakesPossibleBest choiceStations and offsets come off the drawing, at whatever interval you choose.
Rough grading, cut and fillWorks wellBest choiceRead cut or fill anywhere you stand, not only where the laser reaches.
Final elevations on forms (tight tolerance)Best choicePossibleGPS vertical is about twice its horizontal error. Confirm final elevations with a level.
As-builts and quantitiesNot suitedBest choiceShoot what was built in the same project and export it.
Long sites, no line of sightNot suitedBest choiceThe rover only needs open sky, not a view of the instrument.
Accuracy figures are Emlid's RTK specifications for the Reach RS4 and RS4 Pro: 7 mm + 1 ppm horizontal and 14 mm + 1 ppm vertical, with open sky.
How it fits together

It all hangs on the site control.

A licensed surveyor sets the site control. The civil engineer draws the design on that same control. Your rover ties into it, so the stake you set lands where the engineer drew it.

From the office to the stake

Control, drawing, rover, stake

  1. Site controlset by the surveyor
  2. Engineer's drawinggeoreferenced to that control
  3. Emlid Flow 360import the DXF or DWG (Flow Pro)
  4. Your roveron the site control
  5. Stake outpoints, lines, cut and fill

Every link has to be on the same coordinate system. If the drawing isn't on the site control, or the project is set to the wrong system, the stakes land in the wrong place, every one of them.

  • The control sheet (a CSV of points) and its coordinate system
  • The engineer's CAD drawing, georeferenced to that control
  • Emlid Flow Pro for CAD drawings, line stakeout and surfaces

Boundary lines and certified stakeout stay with a licensed surveyor. You stake the construction to the control they set.

The workflow

Construction stakeout, start to finish.

The order the work happens in, from the office to the last stake.

In the officeControl, drawings, project
1

Get the site control and the drawings

Ask for three things: the control sheet (a CSV of the control points), the CAD drawing (DXF or DWG) and the coordinate system they are in. In most of the US that is State Plane on NAD83(2011) in US survey feet, with NAVD88 elevations from GEOID18.

Confirm the drawing is georeferenced to the site control before you go. If it isn't, nothing will line up.

2

Clean up the drawing

Keep only what you will stake. Remove paper-space layouts, unused layers and blocks, duplicate lines, contours and surfaces. Emlid Flow takes drawings up to 100 MB, and a lean drawing is far easier to work with on a phone.

3
A CAD drawing over a project in Emlid Flow 360
The engineer's drawing in Emlid Flow 360. It syncs to the phone.

Create the project and import

In Emlid Flow 360 (the web app), create a project in the drawing's coordinate system and units. Import the control points from the CSV, then the CAD drawing. CAD drawings need Emlid Flow Pro. Points and lines can also come in from CSV, shapefile or KML. For cut and fill against the whole design, import the design surface as LandXML.

Check: The drawing lands right on top of the control points. If it is off, the coordinate system or the units don't match.

On siteTie in to the control, every time
4
CP-2 ON THE CONTROL SHEET BASEassigned CP-2 ROVERchecks into CP-4ILLUSTRATION
The base on CP-2. The rover checks into CP-4 before staking.

Tie in to the site control

Base and rover: set the base up on one of the site's control points. In the base settings choose Manual, then From project, and assign the control point it is sitting on.

One receiver: connect to a network RTK service such as Emlid Corrections, then localize to at least 4 control points that are spread around the site and not in a straight line.

Before you stake anything, shoot a control point you did not use for the setup. If it doesn't check, stop and find out why.

5

Set up the rod

Verify the rod height, turn on the quick-release option in Emlid Flow, and make sure the rod's level vial is calibrated. Tilt compensation on the RS4 and RS4 Pro lets you stake quickly without leveling. Level the rod for the points that matter most.

Stake outPoints, lines and grade
6
FOOTING FROM THE ENGINEER'S DRAWING C-3 YOU Go 1.10 ft east · 1.12 ft north Cut 0.35 ft to designILLUSTRATION
Walk until the target turns green, then set the stake.

Foundation layout: stake the points

Pick a corner on the drawing and tap Stake out. Flow points you to it and counts down the distance. The target turns green within 0.08 ft, Emlid's default. Set the nail or stake. Most crews set offset stakes back from the corners so they survive the dig. On the RS4 Pro, AR stakeout shows the point right in the camera view.

7
2+002+503+00 ROAD CENTERLINE 12.00 ft Station 2+85.00 · 12.00 ft left Fill 0.20 ft to designILLUSTRATION
Station 2+85.00, 12 ft left of centerline.

Road and curb staking: stations and offsets

Pick the centerline from the drawing and choose line stakeout By intervals & offsets. Set the station interval, 50 ft for example, and the offset to the curb or the edge of pavement. Flow walks you to each station at that offset and shows cut or fill there. Line stakeout is part of Emlid Flow Pro.

8
EXISTING GROUND DESIGN GRADE C 0.8 F 0.5ILLUSTRATION
C 0.8: cut 0.8 ft to grade. F 0.5: fill 0.5 ft.

Dirt work: cut and fill

With the design surface loaded, Flow shows cut or fill wherever you stand: red for cut, blue for fill, green when you're on grade within your tolerance. No surface? Enter a design elevation and a tolerance with Stake elevation and read live cut and fill. Write it on the grade stake for the operator.

The design and your project must use the same vertical datum, NAVD88 in most of the US. Mix it with ellipsoid heights and every cut and fill is wrong by the same large amount.

FinishRecord it, check it
9

Shoot the as-builts

Shoot what got built, such as footings, pipe and finished grade, in the same project. Export the stakeout report (CSV) to show design against staked for every point.

10

Check out on control

Before you leave, shoot a control point again. If it still checks, the day's work checks.

Stuck on a step? Call (901) 444-0804. We do this ourselves.

The jobs crews use it for.

FOUNDATIONS

Foundation layout

Corners, offsets and column lines straight from the drawing, no baseline to square up.

ROADS

Road and curb staking

Centerline, curb and edge stakes by station and offset, with cut and fill at each one.

DIRT WORK

Grading, cut and fill

Live cut and fill against the design surface, anywhere on the site.

UTILITIES

Pipe and pads

Stake runs and structures, then shoot inverts and as-builts on the same coordinates.

Stakeout questions we get

Do I still need a surveyor?

Yes. A licensed surveyor sets the site control, and boundary lines and certified stakeout stay with them. You stake the construction to the control they set and the engineer's drawing built on it.

How accurate is GPS stakeout?

Emlid's RTK specification for the RS4 and RS4 Pro is 7 mm + 1 ppm horizontal and 14 mm + 1 ppm vertical, with open sky: about a quarter inch across and a half inch up and down. That is plenty for layout and dirt work. For tight elevation tolerances, such as the top of footing forms, confirm with a level or total station.

Can I use the Reach RX2 for stakeout?

The RX2 is a great pocket rover for GIS and asset mapping, but it is not the ideal unit for construction stakeout. For survey-grade stakeout, use the RS4 or RS4 Pro on a rod.

Do I need Emlid Flow Pro?

For CAD drawings, yes. Pro also adds line stakeout by station and offset, design surfaces, localization and stakeout reports. The free plan stakes out points you import from CSV, shapefile or KML.

Can one person do the layout?

Yes. With the base on control and the phone on the rover pole, one person walks to every point on the drawing. No one has to hold the other end of the tape.

What about next to a building or under trees?

GPS needs open sky. Hard against tall walls or under heavy canopy, accuracy drops. Stake an offset point in the open and tape in from there, or use a total station for that part of the job.

My site has no control. Can I still use GPS?

For rough work you can set your own points with Emlid Corrections. But your stakes will only match the engineer's drawing if the drawing and your rover are on the same control. For anything built to a design, get the surveyor's control first.

Switching from a laser and tape?

Tell us what you build and we will put together the kit, and walk you through your first layout.